
Instruction Manual (2 of 2)
Network > Substream
Determines the video quality streaming settings from the DVR to the LooCloud app.

1. Channel List: List of available channels.
2. Resolution: The supported resolution is CIF.
3. FPS: The frames-per-second sent to your mobile phone. The range is from 1 to 6. The default is 6.
4. Encode: Supports Variable-Bit-Rate (VBR) and Constant-Bit-Rate (CBR). The default is VBR.
5. Quality: Select the quality of video being sent to your mobile device. The default is “lower” quality to save the user bandwidth.
6. Max Bitrate: Select the maximum amount of bandwidth sent to your mobile device.
Use the bottom row to manage all channels at once.
![]() Remember to "Apply" your settings before exiting the menu.
Remember to "Apply" your settings before exiting the menu.
Network > Email
This section helps you set up email notifications. Information may be required from your internet and/or email service provider.

1. SMTP Server: Please confirm SMTP server with your email service provider.
2. Port: Your mail service port number. This is dependant on your email service provider.
3. SSL Check: Provides a secure login. The default is set to enable SSL Check.
4. Send Address: Your email account from your provider
5. Password: The password used to access your email account.
6. Receive Address: When an email alert is triggered, your LooCam device will send emails to these specified addresses. Please be advised that there is a maximum of three email addresses.
7. Test: Use this button to test your settings, and ensure that email notification is set up.
User Management
The User Management screen displays an overview of the active users and their current permission levels. From this menu add users, delete users, or change your current password.

1. Add: Adds a user. When adding a user specify their user name, password and user permission level. User permissions include Normal and Advanced users. Advanced users have all permissions enabled by default. Normal users can have their permissions restricted on the Authority tab. It is recommended that there is only one Advanced user on the system.
2. Delete: Delete a user from the DVR.
3. Change Password: Change the password of the selected user. First, input the old password before changing to the new password.
![]() If it is your first time setting the system up the “Old Password” field will be left empty.
If it is your first time setting the system up the “Old Password” field will be left empty.
Adding a User

1. User Name: Input the user name for the new user using the virtual keyboard
2. Password: Input the password used to log in.
3. Confirm Password: Confirm the password used to log in.
4. User Type: Select the user permission level.
5. Binding PC Mac Address: Select whether to limit access for this user to a specific PC’s MAC address.
![]() If checked the user will only be able to access from a predetermined computer.
If checked the user will only be able to access from a predetermined computer.
Adding A User > Authority

1. Select between enabling and disabling user permissions on this menu. Enable access by ensuring a check mark appears in the relevant box. For each heading select whether you want the user to have access to the designated menus or channels. All permissions set are unique to the specific user. New permissions will need to be created for each new user.
![]() Only an "Advanced" account is able set permissions for other users
Only an "Advanced" account is able set permissions for other users
PTZ > PTZ
This Feature is Not Supported for the Product
Advanced Setup
Options to reset the DVR to factory default settings or import and export settings.

1. Reset: Resets the DVR to factory default settings
2. Import/Export: Import and export DVR settings to and from this DVR.
3. Exit: Return to the previous screen.
Advanced Setup > Reset
Reset the DVR to factory default settings. This will erase any specific users or settings that have been created. You will need to confirm your choice to reset to factory default settings.

![]() Resetting to factory defaults WILL NOT affect any recorded video.
Resetting to factory defaults WILL NOT affect any recorded video.
Advanced Setup - Import/Export
Exchange settings from one DVR unit to another.
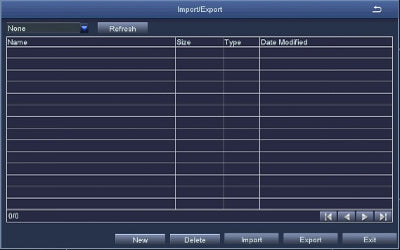
To export your settings:
1. Connect an external hard drive to the DVR through the USB connection on the back of the DVR.
2. Select the “Export” option at the bottom of the Import/Export menu to copy the DVR settings to a file on the USB drive.
3. Select the “Exit” option to return to the previous screen
To import your settings:
1. Insert a USB drive containing previously exported DVR settings into the back of a powered off Loocam DVR.
2. Connect the Loocam DVR to a power source.
2. The DVR will load the new settings while powering up.
Search Menu
The search option contains four different ways to search through your footage. They are:
1. Time Search: Search through your files by date and time
2. Event Search: Search by recorded events
3. File Management: Delete or export selected files
4. Image: Search through recorded snaps.
Search > Time Search
Search through recorded video footage by time and date.

To locate a specific video recording:
1. Left click on the date on the calendar with the mouse. Dates with recorded footage will have a blue square around them.
2. Select the channels you want to search using the checkboxes below the calendar. Selected channels will be marked with a check.
3. Click on the “Search” button in the top right corner of the menu.
4. The left side of the screen will display a light blue box if there is footage for that time and channel.
5. Press the play button ![]() to view footage.
to view footage.
6. You can also input a start time manually using the time field to the right of the play button.
Search > Event Search
Search by recorded Schedule, Motion, Video Loss, Power Loss, or Screen Grab events.

To locate a specific event:
1. Select a date on the calendar with the mouse. Dates with recorded events will have a blue square around them.
2. Select the channels you want to search using the checkboxes below the calendar. Selected channels will be marked with a check.
3. Ensure the Motion option is checked. This product does not support sensor event searches.
4. Select the search button in the top right corner. The list will populate with events from the predetermined date in the chart, with information regarding the channel, start time, end time, and event type. Double click on the event you wish to view. You will be taken to Live View where you can watch your recorded footage.

5. To view the video footage select the event and double-click the left button on the mouse.
Search > File Management
Delete or lock video recordings on the DVR’s hard drive.

1. Select a date on the calendar with the mouse. Dates with recorded events will have a blue square around them.
2. Select the channels you want to search using the checkboxes below the calendar. Selected channels will be marked with a check.
3. Select the search button. The list will populate with any video recordings from those dates and channels. You can watch any recording by double-clicking.
4. Select the video recording(s) to manage by checking the box.
5. Delete: Delete the video recording(s) from the DVR.
6. Lock: Prevent this file from being accidentally deleted.
Search > Image
Search through recorded images by time and date.

1. Select a Start Time and an End Time for your search using the calendar icon. ![]()
2. Select the channels you want to search using the checkboxes below the Start Time and End Time fields. Selected channels will be marked with a checkmark.
3. Select the Search Button. The image screen will populate with the first available image.
4. Delete: Deletes the current image.
5. Lock: Prevents the current image from being accidentally deleted.
6. Save: Saves the selected file to an attached USB storage device. The images will save in the to USB directory /dvrpicture.
7. Save All: Saves all the files to an attached USB storage device. The images will save in the to USB directory /dvrpicture.
Backup
Enables the user to create a backup copy of any important video and image recordings.

![]() Before backing up any files please make sure you connect an external hard drive using the USB input to the back of the DVR. Do not use the front USB input.
Before backing up any files please make sure you connect an external hard drive using the USB input to the back of the DVR. Do not use the front USB input.
1. Select a Start Time and an End Time for your search using the calendar icon. ![]()
2. Select the channels you want to search using the check boxes below the Start Time and End Time fields. Selected channels will be marked with a check mark.
3. Select the Search Button. The image screen will populate with the first available image.
4. Select the file you’d like to backup by checking the box next to the file.
5. Select the Backup button to copy the files to your external hard drive.
Backup Information
Before backing up the information you will see the following screen:

1. Start Time: The date and time the recording starts.
2. End Time: The date and time the recording ends.
3. The Number of Files: The number of files being transferred to USB device.
4. Size[GB]: The size of files being transferred in gigabytes.
5. Storage Media: The name of the device you are transferring your files to.
6. Free[GB]: The amount of free space remaining on your USB device.
7. Save File Type: The file type of the exported files. All devices are defaulted to .AVI for maximum playback compatibility.
8. Progress Bar: This bar will show you the progress of your file transfer.
Information Menu
This section contains several different information logs, tracking the use of your LooCam DVR System.

1. System: Displays basic system information for reference purposes.
2. Event: A searchable list of motion and video loss events that have occurred between the selected dates.
3. Log: A searchable list of actions taken by all users while accessing the DVR system.
4. Network: The network menu displays the current network parameters. It is for reference purposes only.
5: Online Users: A log displaying the user information of user who are currently logged into the DVR through online connections.
Information > System
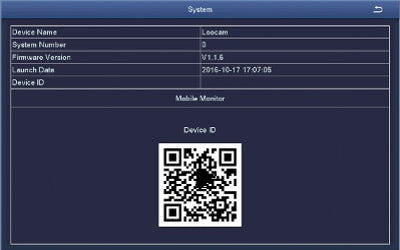
- System Number
- Firmware Version
- Launch Date
- Device ID - The Device ID has been removed from the above image for privacy purposes.
![]() Your Device ID is your unique identifier for LooCloud.
Your Device ID is your unique identifier for LooCloud.
Information > Event
The Event List is a searchable list of motion and video loss events that have occurred between the selected dates.

To Search for an Event:
1. Select a Start Time and an End Time for your search using the calendar icon. ![]()
2. Select the channels you want to search using the checkboxes next to channel number. Selected channels will be marked with a checkmark.
3. Select the Search button. The list will populate with any files from the selected times and dates.
4. Export: Exports the file list to USB Flash Memory connected to the DVR.
5. Check the box if you’d like to include Motion events in your search results.
6. Check the box if you’d like to include Video Loss events in your search results.
Sensor events are not supported by this device.
Information > Log
A searchable list of actions taken by all users while accessing the DVR system. From this screen you can see which user has been accessing which function.

To search the log:
1. Select a Start Time and an End Time for your search using the calendar icon. ![]()
2. Select the type of action you want to search for using the checkboxes. Selected channels will be marked with a checkmark.
3. Select the Search button. The list will populate with any files from the selected times and dates.
4. Export - Exports the file list from the DVR to any connected USB Flash Memory.
Information > Network
The network menu displays the current network parameters. It is for reference purposes only.

Information > Online Users
A log displaying the user information of user who are currently logged into the DVR through online connections

Disk Management
View the status of the DVR’s internal storage, as well as any external USB Flash Memory devices attached to the DVR.

To manage files:
1. Check the box for the drive you want to manage. The DVR’s internal hard drive will always be the first hard drive on the list.
2. Change read and write permissions for the selected hard drive.
![]() Do not alter the permissions for the DVR’s internal drive as that could disable the ability to record.
Do not alter the permissions for the DVR’s internal drive as that could disable the ability to record.
3. Apply Changes to selected drive
4. Format: Formats selected drive. This will delete all video and image recordings from the hard drive, and a screen will prompt you to confirm your decision.
5. Browse: Displays other information about the hard drive, including remaining capacity.
6. Refresh: Refreshes the disk management list for new disk drives, including external USB devices.
Logging Off
Before logging off the system will ask you to confirm. Logging off will log out the current user but not shut down your LooCam DVR.

Shutting Down your Loocam DVR
Before shutting down your LooCam DVR, the system will prompt you to confirm your decision. The DVR will not record while shut down.
